Thursday, August 31, 2017

A Quilt Top, a Mess, and a Sneak Peek

Remember a couple months ago I made this quilt?


When I made those square in a square units, instead of cutting exact sizes, I used flip and sew corners, and I double sewed the corners giving me a bunch of bonus HST's. I debated a few different things to do with my bonus HST's, but decided on this...


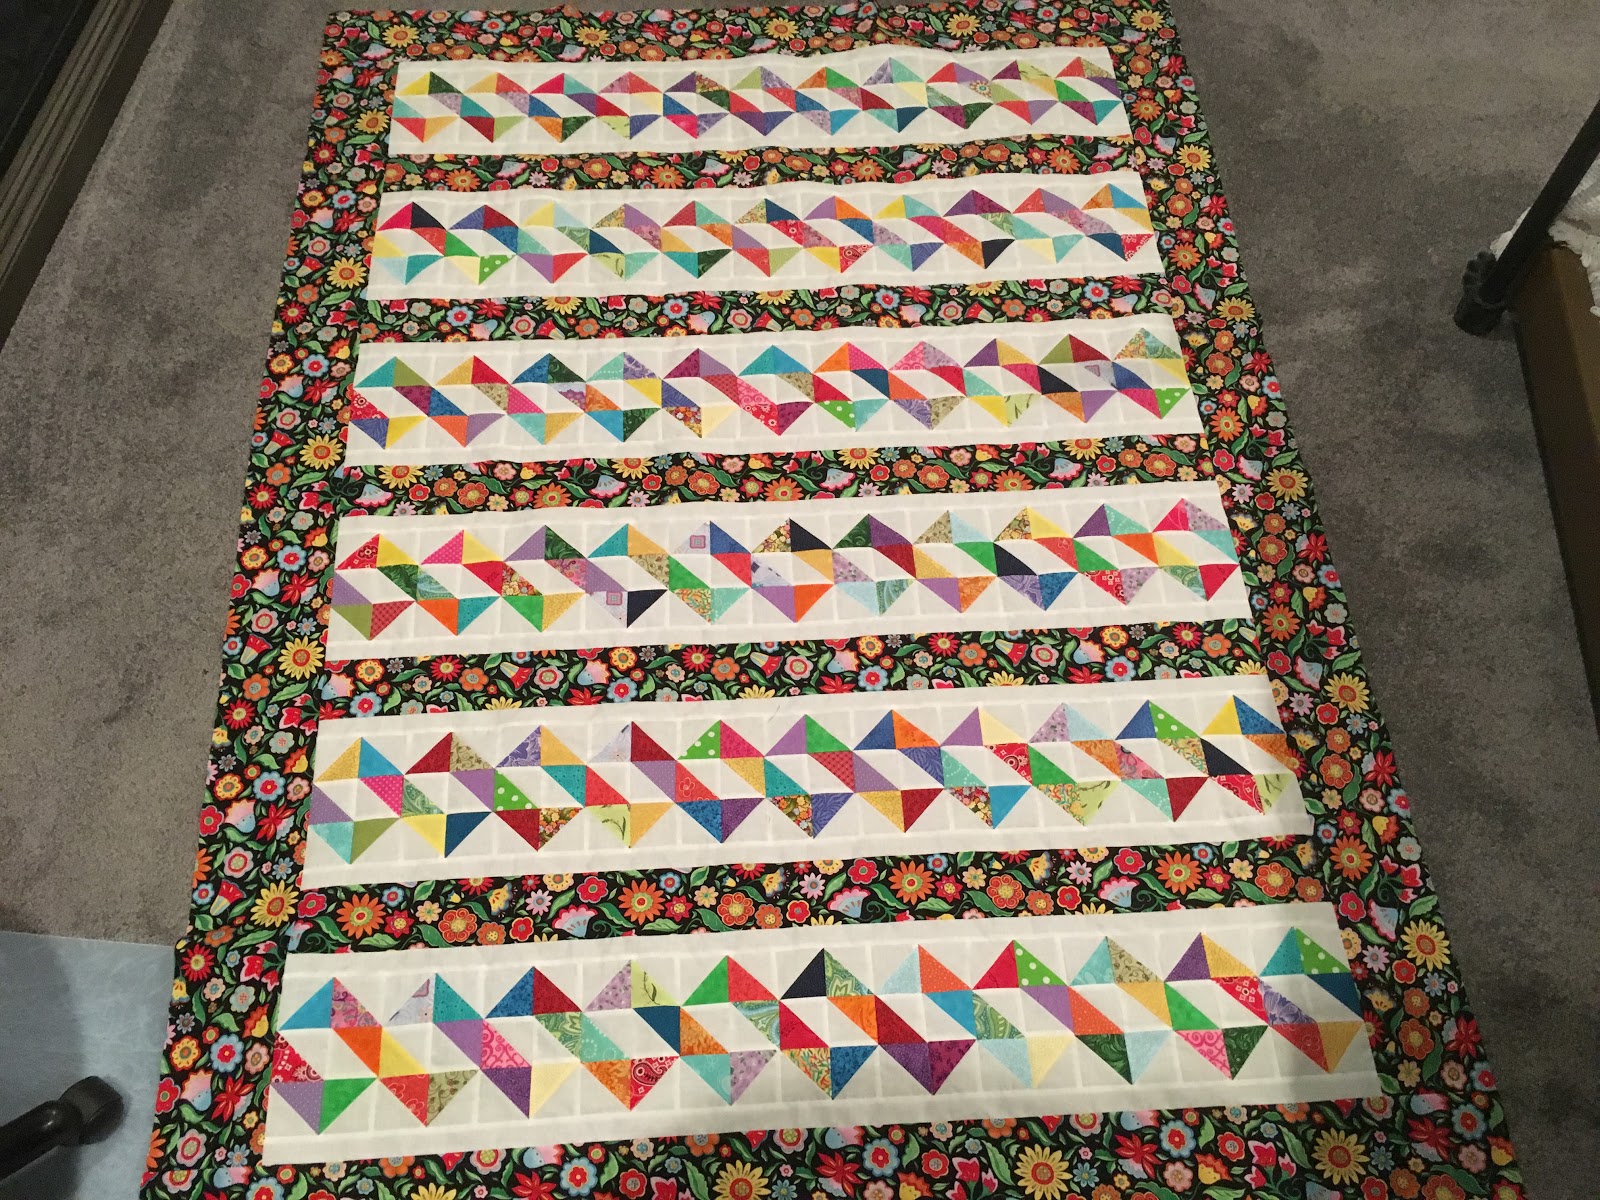
I really love how this quilt top came out, I think it is just adorable. I used every bonus HST in this quilt, every single one, with none leftover, and I didn't have to make any extra for this quilt. I had the border fabric in my stash, and I honestly can't remember where I got it. I'm thinking I must have picked it up at a thrift store, because I only had 1 2/3 yards, and I never would have purchased such an odd amount to stash. I used all of the border fabric in this quilt, aside from a few scraps that went into the scrap user system. Since I knew I was cutting it close on the border fabric, I used what I had to determine the strip width and border width. It worked out really well I think. I'm never one to use a formula or ratio to determine border widths, it is usually a matter of how much fabric I have, and I need to make it work. 

My room is such a mess! I did manage to get one quilt together, but I have parts to several others all over my room. 


I subcut all the stripsets for the Blooming Nine Patch quilt. You can't really tell in this photo, but the container in the back left actually has finished nine patches. All the stripsets for that bargello quilt are just piled up, I haven't done any more with them.


Here is the table to the left of where I sit at my sewing machine. It's crazy to have this many block parts on this table from so many different projects! I need to get these block parts sewn up, then I'll be able to assemble a few quilts, and thereby clean up some of the mess!

On the right front of my table, you can see my new bobbin savers, bright lime green, with size M bobbins in them. Why size M???


I bought a Tin Lizzie sit down longarm!!! I've been thinking about getting one for a while, and I've used both a Tin Lizzie and a Handiquilter at a quilt show. I wanted a sit down model, because although I technically do have room for a quilting frame right now, someday we are likely to downsize, and I don't want that to be an issue. I tend to make really big quilts, king sized is common for me, and I'd have to have the largest frame if I wanted a longarm on a frame. Honestly, I just don't want that much of my house taken up by a quilting frame. 

I wasn't a big fan of the design of the Tin Lizzie table, so I ordered a Quilty cabinet from Arrow Cabinets. Honestly, even if I had gone with a Handiquilter, I probably would have purchased the Quilty cabinet. 

I really debated between the two machines. The Tin Lizzie doesn't have a stitch regulator, but I don't like the way the Handiquilter stitch regulator works, and wouldn't have bought it anyway. I learned to FMQ without a stitch regulator, so I'm sure I will get used to it again. Sometimes I forget to turn the BSR on on my Bernina anyway. So, basically, stitch regulation was not a serious consideration for me. 

On lighting, the Handiquilter is a clear winner. Lighting is important to me, and I'll be looking at ways to improve the lighting on the Tin Lizzie. Since the Tin Lizzie was $2,000+ less expensive, I can probably buy some extra lighting.

Here is something that I'm probably odd on, I like Tin Lizzie better in the fact it is all mechanical. No computer interface to blow, it's got no bells and whistles, which makes it easier to use and less expensive to fix. 

Handiquilter has a 16" throat, Tin Lizzie an 18" throat. Either one would feel huge after I've spent the last few years shoving quilts through a 7.5" throat. I'm anxious to get to know my Tin Lizzie, but I'm waiting on the custom insert to come for the cabinet. I'll be moving the Tin Lizzie into my bedroom for now, and moving my Bernina into the living room. I'm hoping to get a bunch of those block parts sewn up before I have to move everything. If I can get a few of the current projects into quilt tops that would be better! 

Friday, August 25, 2017

Love/Hate Relationships

If you think I'm going to be talking about people, sorry to disappoint you ;-) Right now my love/hate relationship is with strip piecing. When I first started quilting, I did a lot of strip piecing, but as time goes on, I do less and less of it. I like lots of variety in my quilts, and normally strip piecing doesn't allow for the type of variety I prefer.

When I'm making quilts for other people, my tastes are not what matters, theirs are, so I end up using fewer fabrics, or colors I dislike (SO MUCH BLUE- I HATE BLUE!!!) or techniques that aren't my favorite, but they make more sense for the pattern. 

In the last post, I showed my ironing board overflowing with stripsets, that were all waiting for pressing. I finally pressed the last of those this morning. I really hate pressing WOF fabric stripsets. Shorter stripsets (from fat quarters or scraps) aren't as bad, but those long, tangly, WOF stripsets are hard to press with no folds, no flipped seams, just neatly done. 

One of the quilts I'm making stripsets for is a Blooming Nine Patch. Normally for nine patches I just cut squares, and web the blocks as I sew. For the quilt I'm making, I need 480 3" finished nine patches. I need 8 different colorways in sets of 60. Now, I'm not fond of strip piecing nine patches, but did I really want to cut 4,320 squares, and hope I sewed them all together correctly for the 8 different colorways? In this case, stripsets make more sense, and when I get all those stripsets sub-cut, re-sewn, and see a huge pile of nine patches suddenly come together, I will LOVE that!

I only have half the stripsets I need sewn for the Blooming Nine Patch. My goal is to have all the stripsets for it done and sub-cut by tomorrow night. 


^My purple/white stripsets are already sub-cut into blocks. SO much easier to work with now! I have more cutting to do on these before I sew any more on them, but I'm happy to not have those WOF stripsets sitting around anymore. This quilt will be a Strip Twist.


^These stripsets need to be sewn together, because I'm making my first bargello quilt. Sewing a bargello quilt doesn't worry me at all, but sub-cutting these huge stripsets somewhat terrifies me. I'm hoping it will be easier than I think it will, and if worse comes to worse, I have two extra strips of each fabric cut, so I could make extra stripsets if I need to. 

I didn't get as much sewing done this week as I expected. Even with fewer people in the house, life still happens, and interruptions occur. I'm feeling pressure because so many quilts I'm working on are so overdue, and I'm normally an on time person. No one is bothering me about the quilts, they understand I've had a lot going on. I'm the one pressuring myself, but probably not for the reason you'd think. I want to get the gift quilts done, so I can work on some fun quilts. I have some bucket list quilts I'd like to start, as well as some UFO's I'd like to get finished. The gift quilts need to be finished first, but I've already got a couple on my list for 2018!!! So many blessings come with a big family, so many excuses to make more quilts!


Friday, August 18, 2017

Too Busy Sewing to Blog

I have been sewing a LOT, and not thinking much about blogging, so if this is disjointed, I'm sorry in advance. 


All of this is waiting to be pressed. I have an ironing station set up in my bedroom, but it heats up the room too much for me to want to do it in there, so I set up an ironing board in the kitchen. This ironing board is 30+ years old, and I think it's time for a replacement. It's not particularly stable anymore, and I think it may just be time to bite the bullet and replace it. I looked at some ironing boards online, and I saw really cheap ones that I'm not thinking will last long, and I also saw some REALLY expensive ones. Who knew you could spend $1,000 on an ironing board??? Any suggestions on a decent ironing board that doesn't cost a mortgage payment to buy?

Looking at all of that waiting to be pressed, you may think I haven't pressed anything this week, but that's not true either. To be fair, I have been waiting until I absolutely have to press things. Summer in Southern Arizona is no laughing matter, and heating up the house is less than desirable right now. 


All of these were pressed this week. I had so many blue 2" strips in the scrap user system, I cut out two blue quilts at once. One will be a wedding quilt.


Here's the layout I'm going to use. The quilt will be 108" square. The quilt idea came from a magazine last spring??? I think the quilt design was called Waterfall, but maybe not because a google search didn't find it. The magazine quilt was much smaller, and didn't use the same layout, but my design is based on someone else's. In the photo of pressed blocks, the blocks in the middle are for this quilt, but the other blocks for it are still on my ironing board board waiting to be pressed. No border for this quilt, I'm using borders less and less these days. The quilt in real life will be a lot more colorful than this, because I'm using up a LOT of novelty fabric scraps. 

So, if the framed blocks are pressed, and the blue strip blocks are on my ironing board, what's with the shoebox full of blue strips? Actually, the shoebox is filled with blue strips sewn in pairs, that will go for a Weed Whacker quilt. All of the corner pieces that need to be sewn onto the pairs of strips are also in the shoebox. I pieced a traditional piano key border for the Weed Whacker quilt, and it's pressed too. 


I wrapped the four long borders around a piece of pool noodle, so it will stay nicely pressed until I need it. Between the two quilts I'm busting a LOT of blue scraps, which is a really good thing.

So that only leaves one stack of pressed blocks unexplained. Remember I made a comfort quilt last month? Well I took all those bonus HST's, and made blocks for a Twisted Ribbon quilt. 

I think the Twisted Ribbon quilt will look pretty cool when it's done. 

So why am I jumping from project to project without finishing anything? I actually have a(n) excuse reason. DH will be out of town for a week, and I want to get as many quilts into blocks as I can before he leaves, because while he is gone is the perfect time to assemble quilts. If I lay out quilts on our bedroom floor, but don't manage to finish getting the top assembled before bedtime, better to only inconvenience myself than DH too. 

As for all the stripsets on the ironing board, I'll explain what those are going for next time. 

Friday, August 11, 2017

Microburst!

I've had a pretty productive week. I finished the blocks for the center of one wedding quilt. I also made 124 of 144 blocks for another wedding quilt, when I was rudely interrupted by a microburst! I shut my Bernina off as soon as the weather turned nasty. I'd hate to fry the motherboard with a power surge. Since I wasn't sewing, I watched out the window.


Crazy, right??? 

Here's the neighbor's house diagonal from me.


That tree wasn't on their house before this storm. Another house on our street ended up with a tree on it, and that one was far more damaged. We drove around the neighborhood today, and a couple of the houses lost their roofs, several lost carports. There are downed trees all over, and an apartment complex right by us had so many trees felled by the storm that people were trapped in their apartments and had to be rescued. We were without power for about nine hours, but I think that's a quick turnaround considering how much damage there is. 

We were blessed that we had almost no damage. I was home alone at the time, and I was surprisingly calm, even though I anticipated damage to our house. The house was shaking, and debris was flying, so I was figuring there was a good chance we'd have some serious damage. 

Today, after a look around the neighborhood and some errands done, I'm being serenaded by the sounds of chainsaws and hammers, as people go about repairing the damage. That's what people do, rebuild after storms, whether it's literal rebuilding after a physical storm, or emotional rebuilding after a traumatic event. Resilience is one of the more noble human traits.

Wednesday, August 2, 2017

Cutting? A Little. Sewing? A LOT!!!

In my last blog post I mentioned I couldn't find my 2.5" shirt strips. Well, technically, I still haven't, BUT, I remembered that when I first started using the Scrap User System, I didn't keep shirt parts separate. I looked in my regular 2.5" strips, and found a decent amount of shirt strips, so I cut those up into squares and kitted up that last project. 

I've cut enough to keep me going for a while, so I've been sewing away. My main project right now is the wedding quilt for DS the Elder and DDIL. They just celebrated their first anniversary, so that's a good indication of how far behind you fall when you don't quilt much for a year. My goal on all these wedding quilts I am behind on is to get it to the couple by their second anniversary. 

I love the pattern I chose for this first wedding quilt, BUT, it's an easy quilt to get mixed up on. There are only two types of blocks, but multiple colorways of each one.


I've got all the slanted blocks done, but I have a long way to go on the nine patches. You need differing amounts of each colorway too, so I have to pay really close attention to what I'm doing. Everyone has their own way of doing things, but for me, I need a completely different leader/ender project when my main project is complicated. I'm afraid if I just used another nine patch as my leader/ender, I'd end up with 20 of a colorway, when I only needed 8. 

While I was making the slanted blocks with all those flip and sew corners, I was using some Flying Geese as my leader/enders. Now that I'm working on nine patches, I made those Flying Geese units into quilt blocks.


I have more Flying Geese units to sew, and I will sew them, next project I have flip and sew corners. I really like how these blocks are coming out, and I may cut more when I run out and make this into a bed sized quilt. You never know, but for right now these are just being set aside. 

Now, on those slanted blocks with the flip and sew corners? I sewed a second line about 1/2 from the first, and then had a stack of bonus HST's. Because of the odd colorways of blocks I needed, the bonus HST's were in different amounts in each color, just like the main blocks. I trimmed all the HST's to size, and yesterday I sewed the bonus HST's into 12" blocks.


I didn't want any of the blocks the same, so I just played around with what I had. I've decided to piece the backing of this wedding quilt into what will basically be another quilt. I pieced these blocks as leaders/enders while making the nine patch blocks. I have a few different ideas in my head about how to add to these blocks for the backing. I am planning on a medallion style backing with the last border being very wide, knowing I won't be able to line the top and backing up exactly, so I'm planning for fudge room. 

Now that I've used up all the Flying Geese unit I had, and I used all the large bonus HST's, I'm back to using these blocks as my leader/enders.


 I get asked pretty frequently how I keep all my projects straight. Well, for one thing, I am actually only sewing two things at once. When I was using my bonus HST blocks as my leader/ender, I was working on those and nine patches. When I was sewing up the Flying Geese blocks as my leader/enders, I was working on those with nine patches. Once I've used up all of whatever units I have, I move those blocks off my sewing cabinet, so I don't have as much visual clutter. Every time I finish the correct number of blocks in each colorway, I move them off the sewing cabinet. 

I also have two areas that I use for laying out blocks. I like to have a table at 90 degrees to my sewing cabinet. Right now, that's where I'm laying out my leader/ender block since those are larger than my main project blocks.


To the right of my sewing machine, on my sewing cabinet, I'm laying out the next main project block.


I think it sounds like I'm working on more than I am, because I have so much kitted up right now. I will keep changing what I am working on, as I run out of units of certain things. I am hoping to get all the units made for more than one wedding quilt in August. DH will be away for a week in September, and that would be the perfect time to assemble some quilts. I'll likely have one quilt at a time spread out on the floor of our bedroom, so having some time where I don't have to clean up before he gets home from work would be good. It can take a while to get these huge quilts assembled. 

Oh, I wanted to tell you about something I heard this week, that I'm already putting into practice. I was reading through the posts in one of my sewing Facebook groups, and someone mentioned their hip was hurting after sewing for long hours. I've been having the same problem, so I anxiously read through the comments. One lady said her hip hurts if she doesn't put something under her left foot, to raise it to the same height as her right foot on the sewing pedal. She said she used a piece of 2x4 she had lying around. I looked around my sewing room, and found a plastic box about the right height, and I've been resting my left foot on it. What a difference it has made! 

I knew my set up wasn't the best ergonomically, because I have short legs and even with my adjustable chair at the lowest height, my legs are still not at a 90 degree angle, and they dangle down. Because of that positioning of my legs, my legs tend to fall asleep, my ankles swell, and I'm just basically not getting good circulation in my legs when I sew.  I try to get up and move around pretty often, but sometimes I just get "in the zone" and forget.

Anyway, now that I've raised my left foot, my legs are almost at 90 degrees, I'm realizing how twisted my body was before from having one foot up and one foot down. No back ache, no hip pain, less swelling, it's amazing! I think I may have DH build me something to put my feet on. I'm thinking of it being just a tad higher than what I'm using now, a place for my sewing foot pedal to keep it in place, and a rest for my right foot when I don't want it on the foot pedal at all. Any suggestions?